Kerbin Moon Circuit Royale: A Short Film

Kerbin Moon Circuit Royale: A Short Film

Watch on YouTube: https://youtu.be/9DRUsJ0YmC4

In the realm of hard problems, Kerbal Space Program offers many options. This story focuses on one such problem: land a single Kerbal on both moons in a single mission and return safely using the lowest budget at takeoff. There’s a lot to cover here, so let’s dive right in.

At first, the engineers focused on landing only on Mun and returning. We knew every design decision would be critical to the success of the mission. The first iteration used just a command chair and one of each of the things Jeb needed to maintain control of the vessel. We even considered leaving the battery out, but quickly realized the engine gimballing alone would make it very difficult to pilot. Everyone wanted to give Jeb at least a fighting chance of landing this thing.

It was immediately clear the optimal design would include a big first stage, deploying a tiny orbital vehicle payload to low Kerbin orbit. So, the team hastily assembled the first prototype, and Jeb hopped into the cramped quarters of its command seat. Looking back, it’s pretty clear the fairing was a lot more luxurious than originally anticipated. It ended up being basically a motorcycle in space. The view was amazing!

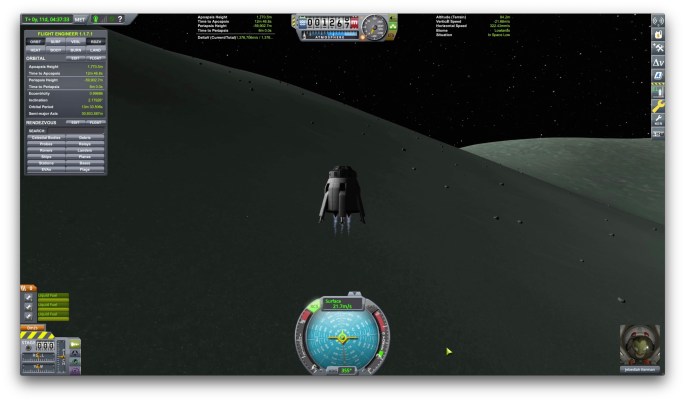
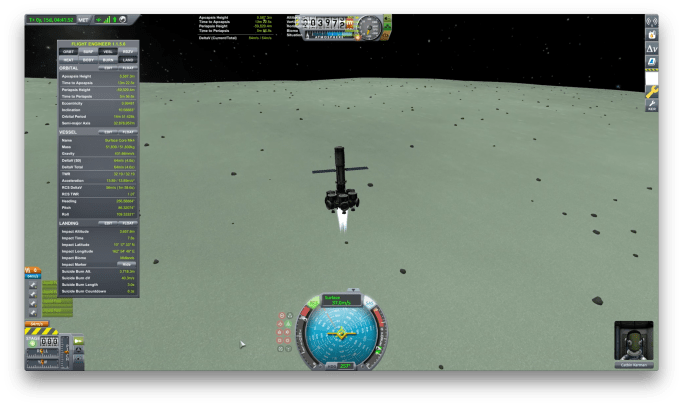
From low Kerbin orbit, Jeb aimed for a low Mun periapsis to take full advantage of the Oberth effect. Dropping in around 6km, he charted a retrograde burn to settle into a nice equatorial orbit before descending into the munar highlands. He knew he would need less energy to return to orbit if he landed at a high altitude. The landing was amazingly smooth … until the last moment, when there was an unexpected jerk in the pitch input. Forensic evidence from the, uh, “returned craft” would reveal the retrograde vector bounced off the ground plane and went negative. Jeb had to react quickly to prevent catastrophe. His report explicitly praised the helmet designers.

As he left the Mun surface, he pondered his likelihood of surviving the re-entry into Kerbin’s atmosphere without any kind of enclosure. He had to jettison the engine to reveal the heat shield he would use to keep cool during the aerobraking maneuver. The engineers warned about the possibility of some light heating on the re-entry, but Jeb got an A in ablative materials class. He knew this was a suicide mission. He had mistakenly dropped the Kerbin periapsis too low when leaving the Mun, and he had no fuel left to correct the mistake. He hoped for the best, but…

After an appropriate mourning period, Jeb’s brother Jeb announced he would honor his brother’s sacrifice with another attempt. He would use the same craft, but he would make a few adjustments first. He liked the overall design, but he felt there should be just a little more fuel in the third stage. The resulting fairing was a little too close for comfort on the ascent, but he felt like it was a rite of passage and left the discomfort out of his report.

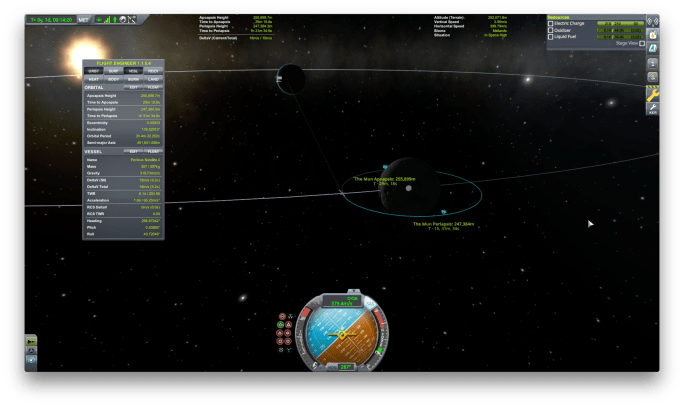
Just like his brother before him, Jeb was able to pilot his modified craft to a smooth Mun landing. And just like his brother, his landing suffered the same awkward pitch jerk, bouncing off the ground. We really need to get that fixed… The landing must have disoriented Jeb. Before the medical team could assess him – and against the advice of the ops team – Jeb decided to chart a course to Minmus. They told him there was no way he could make it, but he tried anyway. Given the recent loss of his brother, everyone at the Kerbal Space Center took this news pretty hard.

It was pure determination that motivated their other brother Jeb to take bold action. At this point, all of Kerbin was devastated by the loss of two intrepid Kerbonaut brothers. The entire planet was reinvigorated when he decided to make another attempt. So, we rallied behind him, made some radical changes to the flight vehicle, and prepared for another potentially demoralizing flight.

This time, we acknowledged the fairing was enough to protect the pilot, but we couldn’t keep it past ascent circularization without making it impossible for the pilot to have any visibility. The only compromise was to use the next lightest part. So, Jeb reluctantly agreed to move the command chair into a service bay. With the doors open, he would be able to see straight up, but the forward view would be fully obstructed. He was going to need to land on instruments alone, and he was up for the challenge.

As he slowly ascended to low Kerbin orbit, he remarked on the durability of this new vehicle. We redesigned the orbital payload to increase the second stage fuel capacity. This gives Jeb enough fuel to land on Mun and begin to return to orbit. The third stage completes the Mun orbit burn, as well as the transfer to Minmus, deorbit, and land. However, Jeb will need almost all the fuel to return to Minmus orbit and transfer into a Kerbin aerobrake orbit.

The engineers agreed with the protective enclosure of the service bay, we could remove the heat shield and use the very highest part of the atmosphere to brake. With the service bay doors closed, Jeb simply kept the vehicle’s only solar panel pointed toward the star and waited in terror for his brother’s fate. He was happy to sacrifice some time to stay alive, so he aimed for a shallow aerobrake at 68km. This proved quite successful, as his suit temperature reported nominal all the way through the aerobrake maneuver and resulting re-entry.

Without the benefit of any space to work, Jeb relied on his instincts to chart a re-entry course, aiming to land at Kerbal Space Center. Subconsciously, he was afraid of exploding, but history will say he was unable to navigate around some troublesome weather, or something like that. As he opened the service bay doors and left his command chair for the last time, he felt thankful for the opportunity to try this in a simulator first. We had all learned some valuable lessons from the practice sessions. Jeb reflected on one particular experience, where he lost consciousness leaving the seat and woke up without enough time to deploy a chute. This time would be different.

As he watched his faithful chariot drift away to inevitable oblivion, Jeb thought about all the hard work and sacrifice made by his family and the engineers who made it all possible. He decided to retire. After all, he now held the record for the best attempt, and his family suffered a heavy burden in the process. He would forever be known as the first pilot to complete the Kerbin Moon Circuit Royale. But, he would not be the last…

How to Automate a Minmus Landing

Watch on YouTube: https://youtu.be/q7GDV539nnc

I don’t want to start off on the wrong foot and say automating a munar landing was easy, so let me say this instead. I was not prepared for the level of difficulty presented by Minmus. To be clear, the Mun landing required more than 25 attempts to achieve a 50% success rate, and that felt like a near miracle. With Mun, the goal was simpler. Its orbit around Kerbin is aligned with the ecliptic. This was a design decision made by the game designers to make it easier for players to make meaningful progress in the game. I’m glad they did because the game is arguably one of the most difficult on the market. The script suffers the same penalties experienced by new players. Things can go sideways quickly.

To review, the munar automation script stabilizes into low Kerbin orbit at 80km before computing a transfer orbit maneuver with a predetermined prograde delta-v. Then, after executing the maneuver, it settles into an elliptical orbit with a low periapsis before circularizing at 20km munar altitude. Finally, deorbit and hoverslam to land on the surface. Simple, right? Again, no.

Turns out you can’t simply adjust the prograde delta-v and let the script figure things out. After about ten attempts doing exactly that, I realized there were some significant barriers. For one, the Mun is in the way sometimes, and the script takes a looooooong time to find a solution. Also, it became clear there was a lot of room for improvement in my approach to throttle control. At this point, the results were not good. In the rare cases when I was able to chart an intercept course, the maneuver execution was … imprecise … and I ended up on an escape trajectory.

This makes sense, if you think about it. There’s a lag between the moment we detect some condition is satisfied and the moment the engines stop producing thrust. Chalk it up to a symptom of an engine with high thrust and high specific impulse. We overshoot every time, as a direct result of this delay. We can use simple solutions attempting to compensate, like decreasing throttle by 75% when we approach the engine cutoff condition. This only really reduces the magnitude of the observed effect and does very little to contribute to a more robust solution.

Our best approach is to rethink the control strategy entirely. The first time, it was simply a matter of activating engines at full throttle, deactivating when a condition is met. To achieve a more nuanced result, we will need to take into consideration how far away we are from achieving the condition. In mathematical terms, this means using a ramp input instead of a step input. A ramp input is more like slowing down gradually before stopping, whereas a step input is like slamming on the brakes at the last moment.

Let’s start by incorporating a proportional controller. Rather than providing a constant step input to the throttle, we reduce the throttle based on the remaining delta-v required for the maneuver. This allows us to go full throttle at the beginning, when there’s a large gap to traverse, and then reduce throttle as we approach the target. This gives us the ability to exercise fine control at the end of the maneuver when precision is most important.

Using this proportional control technique, the script is able to stabilize on an intercept orbit with Minmus. However, even with our precise throttle control, we still experience strange oscillations around the target in some cases. In one case, this was caused by a less-than where I needed a less-than-or-equal-to. In most cases, though, it was because the conditions were error-prone.

One key error I encountered was assumptions about the precision of the time warp tool. I incorrectly assumed the ETA for orbital transition would be accurate within a second. Sadly, it is not. This means sometimes the warp completes before the vessel enters the Minmus orbital patch. This has catastrophic effects on the automation process, as it picks the planet periapsis ETA instead of the Minmus periapsis, which is highly correlated with my cursing at the game. After sorting out this subtle nuance in the logic, the rest fell into place. Ok, so what does the code look like?

As with the Mun landing script, we use a runmode variable to manage each phase of the mission. We’ll start from orbit this time, to focus on the differences presented by a Minmus transfer orbit. Let’s dive in!

The main difference between Minmus and Mun orbits is the inclination. Minmus is inclined about 6 degrees from the ecliptic plane. Without adjusting the inclination, we may need to wait considerably longer to plot a transfer orbit, as Minmus shifts in and out of plane relative to Kerbin. Also, Mun intermittently interferes, making it more important to match the inclination.

As a result, our first maneuver after achieving stable orbit is to compute an inclination maneuver. We do this by creating a node with a starting delta-v in the normal direction. We move the node forward in time, comparing the inclination of the resulting orbit against the previous value until we detect an inflection point. Then, we adjust the delta-v until the resulting relative inclination approaches zero.

Once we have our maneuver planned, we simply time warp to the maneuver and execute the burn. Here, we use a proportional controller based on the ship’s scalar speed and the maneuver delta-v requirement. The limit condition is defined based on a simple threshold. We cut the throttle when the relative inclination approaches zero. Then, we proceed to the next runmode to compute the elliptical transfer orbit.

This phase uses the same iterative technique with constant prograde delta-v to find a maneuver node time with a Minmus intercept. Once we have a valid transfer orbit planned, we time warp to the maneuver and execute another burn. Again, we use a proportional controller based on speed and delta-v requirement. Again we use a limit condition.

Early versions of the logic simply added the appropriate delta-v and hoped for the best. This often left the vehicle on an elliptical orbit, but not necessarily on a Minmus intercept. This is because of the extended burn time introduced by the proportional controller. Maneuver nodes assume instantaneous impulse, and there’s no way to add so much energy so fast without squishing the meatbags.

A better way to achieve our stable intercept is to use a different condition entirely. Rather than wait for a specific delta-v change, we cut the engines immediately upon detecting a Minmus intercept. This helps to guarantee an intercept, but it’s worth noting this is not an efficient algorithm. It simply results in a well understood landing sequence, where we can re-use the components from our Mun landing script. We use different values for the altitudes, but otherwise the rules are the same. At this point, we have achieved our most significant milestone in the process. Time to enjoy the fruit of our labor.

While we watch the best attempt, let’s reflect again on the difficulty of this challenge. For the Mun landing, it took 25 attempts. This time, it took more than twice as many attempts. In total, this video required 64 attempts to reach the same success rate criteria. It seems only fitting to show all the attempts as one magnificent composite. So, sit back and relax. Enjoy this time lapse of all the attempts at the same time.

Mining Part 2, Mining Colony

Vimeo: https://vimeo.com/324381843

YouTube: https://youtu.be/1MprhkvcIaw

Welcome to Kerbalism! I’m your host, Aubrey Goodman. In this episode, we upgrade a manned surface station into a mining colony.

In our last episode, we landed a construction core on Minmus, ready to expand itself to support higher volume resource processing. Now, it’s time to grow our station into our first mining colony. We need a manned presence to enable ongoing mining operations, extracting resources from the surface.

With asteroids, there is a much smaller opportunity for resources. If the asteroid is only one thousand tons, we spend a lot of energy and time with finite benefit, equal to the mass of the asteroid. We must repeat this for each asteroid we wish to harvest. If the asteroids are small, we may use more resources capturing them than they yield from processing.

Moons are different. Resource abundance on the moon surface is effectively limitless, compared to the cache in the asteroid. Once we’re settled in at a good location, we can produce an arbitrary amount of fuel and send it back to orbit. We’ve chosen Minmus because its surface-to-orbit delta-v is very small. The cost of sending resources from the surface to orbit is much lower than Mun or Kerbin. From the surface of Minmus, we can launch into low planetary orbit for about one third the cost of launching from the planet directly.

The construction core is designed for expansion. The goal is to land the bare minimum mining gear and use it to build the rest on-site. Our station core has both radial and vertical expansion options. After we add processing components, we expand outward with more support struts with the same radial and vertical options. These become new expansion points and we repeat as needed.

Of course, expansion comes with its own challenges. Our first expansion of processing equipment was lost when it overheated and exploded. Fortunately, no other nearby parts were damaged. The expansion plan must include increased solar and thermal management. We also need to leave room for ships to land for refueling. These vessels will not be docking in the traditional sense. They simply land near the station and connect via fuel hose. The hoses are limited in length, so ships will need to land close to the hub and wait for colony crew to attach the hose before fuel transfer can begin. Once attached, the station can transfer stored fuel or make new fuel on-demand, until the ship’s reserves are full. Then, it’s simply a matter of detaching the fuel hose and blasting off to Minmus orbit to rendezvous with an orbital fuel station.

Using this technique, we can deliver fuel within our planetary system to support the needs of any ships traveling between the planet and its moons. As we expand to other planets, we create new mining colonies on moons as needed.

As always, thanks for watching Kerbalism!

Mining Part 1, Construction Core

Vimeo: https://vimeo.com/314334638

YouTube: https://youtu.be/HvigCivcMvg

Welcome to Kerbalism! I’m your host, Aubrey Goodman. In this episode, we build a manned station on the surface of a small moon using a construction core.

In our series on asteroid mining, we used unmanned probes with mining equipment to extract and process resources from nearby asteroids. We converted them into fuel and metal, the raw materials required to expand the capabilities of an orbital construction platform. Now we must accumulate enough rocket parts to begin building our construction core.

The core itself has an empty mass of about 20 tons, so we’ll need at least 20 tons worth of asteroid just to provide the bare minimum mass. In KSP, there is no waste from the refining process. In reality, this would involve a consideration for waste management. For our purposes, we’ll simply define our threshold as double the empty mass to be safe.

Turns out we need more than we had available in our captured asteroid, so we need to capture another one. After a bit of patience, we find a viable target and proceed with intercept. This time, we find one much larger, so it will be sufficient for this mission and hopefully others. Our patience pays off! We’re fortunate to secure a huge rock with over 2500 tons of viable resources.

Now, we ferry ore back and forth between our harvester and our construction platform, while the processing equipment churns the ore into rocket parts. After many ferry trips, we have enough raw materials, and construction begins.

While the core is being built, we change the focus of the ore processing equipment. We must convert enough fuel to enable the core to execute the transfer orbit maneuvers and land safely. The core has just enough fuel reserves to make the entire trip from planetary orbit to landing. Once we land, we will be able to make as much fuel as we want.

Also, we need to identify an ideal landing zone, where resources are abundant. We do this using a resource surveyor in polar orbit around Minmus. The surveyor satellite provides a map of ideal landing locations. We select a viable equatorial candidate and begin the landing sequence.

Our station does not have landing gear. Instead, it has heavy pads for its base, so we need to set it down very gently on a flat surface. We selected a landing zone in a flat equatorial region with sufficient resource abundance to support our needs. In our next episode, we begin to expand the capabilities of our surface station to support fuel harvesting on a larger scale.

Thanks for watching Kerbalism!

Asteroids Part 3, Orbital Fuel Infrastructure

Vimeo: https://vimeo.com/313035570

YouTube: https://youtu.be/s0joNt7b0D8

Welcome to Kerbalism! I’m your host, Aubrey Goodman. In this episode, we build our first ship in space using resources collected from asteroids.

Building things in space isn’t much different from building on the planet’s surface. The laws of physics are the same, and delta-v calculations rely purely on thrust, mass, and fuel. The main reason we build in space instead of on the planet is the cost of sending things into orbit. Every craft we build must use a minimum delta-v to launch into orbit. This means we need exponentially larger launch vehicles for larger payloads. If we build in orbit, we only need to build the payload.

This means our spacecraft designs can now focus on optimizing for mission requirements. It also means we are no longer constrained by the aerodynamic environment. With the exception of atmospheric surface landers or gas giant surveyors, our designs need not take drag forces into consideration, since they will always be in space.

First, let’s look at one of our most important vehicles – the ore tug. This craft will ferry ore between the asteroid harvester and an orbital construction platform. It will need enough fuel reserves to perform the transfer orbital maneuvers required to move between the harvester and construction platform. It needs to account for a full ore storage tank in one direction and an empty tank in the other. This way, we don’t over design and bring more fuel than we need.

Next, let’s consider the construction platform itself. The platform is assembled in space, just like the other stations. We launch various components in phases, starting with a core and adding empty storage containers and fuel tanks. Since we will be building things using raw materials, we will need containers for those materials. The size of our containers will be the limiting factor preventing us from building beyond a maximum mass. We need the materials on-hand to build our craft.

With our fully operational station, we can begin to ferry ore from the asteroid. Here, we use some KSP addons to approximate the logistics of manufacturing. Ore is processed into metal and fuel. Metal is subsequently processed into rocket parts, which we use to assemble our spacecraft.

After we have processed and prepared our resources, we begin construction of our first spacecraft. We’re going to build onto our existing station first to expand its existing capabilities before we start building other things as well. Then we’ll build a construction core, with all the capabilities of our orbital platform.

In our next episode, we land our construction core on Minmus and use it to begin building other components.

Thanks for watching Kerbalism!

Stations Part 2, Lunar Orbit

Vimeo: https://vimeo.com/309137882

YouTube: https://youtu.be/YZj6RmCgXJ8

Welcome to Kerbalism! I’m your host Aubrey Goodman. In this episode, we deploy orbital stations to our moons.

In our quest to explore our solar system, we seek new information to help us make sense of the universe, to expand our understanding of physics. Having a manned station in orbit around a moon helps pave the way toward increased traffic to the moon and acts as a support point for missions to its surface.

Just as we did for planetary stations, we first send an unmanned fuel pod into low lunar orbit. This will help prepare for future missions. Deploying a manned science station at the same altitude but on the opposite side of the orbit helps increase utility. The fuel pod acts as a last ditch option for crafts running critically low on fuel. Having both stations on the same orbit at opposite ends effectively doubles the chance a struggling craft can dock with a station.

Orbital science stations act as a staging point for science missions to the surface. We want to make sure we have docking ports of all sizes on these stations, again to maximize utility. Also, since this station will be supporting other smaller craft, it needs a large cache of fuel, monopropellant, and electricity.

After the station is assembled in planetary orbit, with all its supporting craft docked, we’re ready for transfer orbit. With fuel reserves adequately filled, we plan and execute our lunar transfer maneuvers. This means a prograde maneuver from planetary orbit and a retrograde maneuver to settle into a low circular orbit around the moon.

From here, we can send our unmanned support craft to the surface to explore and gather samples. We can also ferry tourists to the surface for a space selfie. Tourism helps generate revenue to stoke the financial furnace to pay for our science missions.

We’ve spent a considerable amount of resources just to deploy stations to our moons. It’s going to take a lot more funding to build and deploy manned stations to other planets. In our next episode, we send a manned station to Duna, which is a lot like Mars. Don’t miss it!

And thanks for watching Kerbalism!

Satellites Part 2: Lunar Orbit

Vimeo: https://vimeo.com/307753956

YouTube: https://youtu.be/qCvHz1n0qxU

Welcome to Kerbalism. I’m your host, Aubrey Goodman. In this episode, we’ll review the deployment of satellites to lunar orbit.

First, let’s expand to consider the nearest moon. It requires more deltaV to get there, and more still to stabilize in a circular orbit. The good news is our Kerbin orbital satellite is over designed for its task. Its first stage does almost all the work, and we have plenty of fuel left over in the second stage for transfer orbit burns.

Once the craft is in planetary orbit, we need to perform two maneuvers to stabilize into orbit around Mun. If we do a really good job executing the maneuvers, we will settle into a circular orbit.

Orbital transfer between Kerbin and Mun can be done really at any time from a mostly equatorial orbit. This refers to the inclination of the orbital plane relative to the rotation of the body. Kerbin and Mun have very similar inclination, making it convenient to transfer between them. As we’ll find later, Kerbin’s other moon, Minmus, has a different inclination.

While a transfer can be made between Kerbin and Mun at any time, there are optimal points along the orbit where fuel use can be minimized, due to favorable alignment. Sometimes, we can save a huge amount of fuel simply by waiting for 20-30 mins.

Once we find a transfer orbit we like, with a destination periapsis at the desired altitude – that means the periapsis of the resulting orbit around Mun – once we find that periapsis, we can proceed with executing the maneuver at the appropriate time. Even perfect execution will result in slight misalignment with your designed objective. This is expected. If necessary, you can make corrections with RCS, but this is generally not required.

Now, after some time has passed your craft has traversed its path and is now approaching the periapsis of the destination orbit. You must burn retrograde until you slow down enough to stabilize into an elliptical orbit. Then, bring the apoapsis down to around the same altitude as the periapsis, resulting in a circular orbit.

Kerbin has a second moon, called Minmus. Its orbital inclination is about 6 degrees higher than Kerbin, so any craft headed there must also perform a maneuver to align its inclination. This is ideally done during orbital ascent, which reduces the inclination difference.

Our over designed satellite has enough fuel to enter stable orbits of both moons. But it also does very little. As we add capability to our satellite, the payload mass increases, and the first stage fuel requirements increase exponentially.

So that’s it for lunar satellites. In the next episode, we’ll focus on solar satellites; that is, satellites on an orbit similar to a planet. Those will lead us to a place where we will be able to establish a relay network of satellites that allows us to explore a wider part of the solar system. So stay tuned for that and much more!

And thanks for watching Kerbalism!